- Introduction:
What is Adobe Photoshop?
Adobe Photoshop is a powerful image-editing tool to produce complex graphics for the web and for print. Photoshop lets you create, refine, and optimize Web graphics with ease, or produce Web animations, rollover effects, and other dynamic Web graphics. It has a powerful set of Web tools for optimizing and previewing images, batch processing of images with droplets in the Actions palette, and creating GIF animations.
Image editing is the process of altering images. Many image editing programs are used to create or render computer art from original images such as Adobe Photoshop, Sony Photo Go, Photo plus, etc. Adobe Photoshop is the most powerful image editing program developed and published by Adobe Systems Incorporated.
This tutorial explores the features and editing techniques in Photoshop.
It is important to know how to download, install and open the software. You can download the software in the link http://www.adobe.com/downloads/ or by using bit torrent clients like Utorrent, Vuze, etc. After downloading install the software. Once you installed, you are ready to use Adobe Photoshop.
Getting Started with Photoshop:
To open the software select Start-> All programs-> Adobe Photoshop. A Photoshop window appears as shown in the figure.

This figure shows the Photoshop cs4 version. It is an advanced and easy to use version of all.
The Photoshop Workspace:
Photoshop workspace consists of the following components:
Menu bar– You will probably already be familiar with the menu bar from other programs. This runs across the top of your Photoshop window and contains various menu options for Photoshop’s tools as shown below.
Options bar – The options bar comes below the menu bar and holds extra options for different tools. It also contains the workspace menu, where you can save and load arrangements of palettes.
Toolbox – The toolbox is at the left of your Photoshop window, and contains shortcuts to Photoshop tools.
Palettes – Individual panels that hold information or options for working with your file, known as palettes, are on the right-hand side. Each palette is labeled with a tab and can be minimized, closed, grouped with other palettes, or dragged in and out of a panel group. For example, the Navigator palette contains a thumbnail of the image that allows you to zoom in or out of the image quickly, and to change the part of the image on the screen.
Document window – Each open image has its own document window. The status bar below displays information that’s specific to the document.
The whole Photoshop window looks like this.
- Working in Photoshop:
Now you’ve been introduced to the Photoshop workspace and have a basic idea of where everything is. Let’s get started.
Creating New Document
You can create a new document by selecting File -> New from the menu bar, or pressing the keyboard shortcut Ctrl-N. The New dialog box will appear where you can specify the document size and other settings.
Opening Images
Open images by selecting File -> Open from the menu bar, or pressing Ctrl-O. You can select and open multiple images by holding down Ctrl and clicking on all the files you require in the file dialog box. Now your images are ready to be edited.
Saving Files
In Photoshop Format
Photoshop format is used for saving the file without losing any of the editing data. Save the file by selecting File-> Save and select the location.
In JPEG Format
JPEG is the most commonly used image format. Save an image by selecting File -> Save as, or pressing Shift+Ctrl-S and selecting JPEG in format option.
In GIF format for Web
This format is used for animated images that are widely used in web designing. Select File-> Save for Web and Devices, configure the settings and click Save.
You can also save in many other formats by File-> Save as and select the format to save.
- Photoshop Layers:

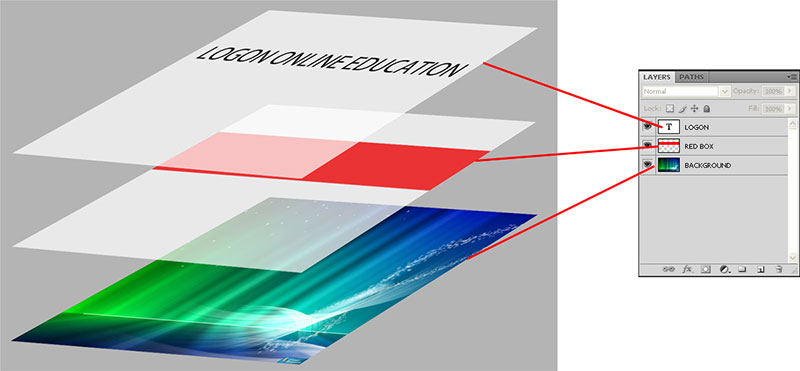
The Layers palette is located on the right of the workspace, in the palette dock. All of your layers are displayed in the hierarchical order on the Layers palette. From here, you can lock and hide layers, create new layers, work with layer groups, and format your layers.
Layers are a powerful feature of Photoshop that allows you to work on one part of an image without disturbing the rest of it. They are like sheets placed one upon another. The above image contains 3 layers. The below figure shows what are they and how the layers are placed.

The transparent parts of any layer, allow the layers beneath that layer to show through. You can show and hide each layer in an image by clicking on its corresponding eye icon in the Layers palette.
Layer Shortcuts and Tasks
- Rename layers by double-clicking on the layer name.
- Change the transparency of a layer by changing its opacity with the Opacity slider, or typing a value into the Opacity box (which is visible when you have the Selection, Move, or Crop tools selected).
- Duplicate a selected layer by pressing Ctrl-J (Command-J on a Mac). You can also duplicate a layer by dragging it while pressing the Alt (Option) key.
- Select multiple layers by holding down Ctrl (Command on a Mac) and clicking the layer names. This forms a temporary link between the selected layers that allows you to move them as one unit, delete them all, and so on.
- You can also link layers together. Select layers by clicking on them while holding down Shift or Ctrl. Once you have selected all the layers you wish to link, click the Link Layers button at the bottom-left of the Layers palette (signified by the chain). Linking layers allows the link relationship to remain even after you select a different layer (unlike the process of simply selecting multiple layers).
- To unlink all the layers, select one of the linked layers and go to Layer > Unlink Layers. To unlink a single layer, select the layer you wish to remove from the link and click its corresponding link icon; the other layers will stay linked. To temporarily unlink a layer, hold down Shift and click on its link icon (a red “X” will appear over the link icon). Reactivate the link by holding down Shift and clicking the link icon again.
- Rearrange layers by dragging the layer above or below other layers. Use the “move down” shortcut Ctrl-[ (Command-[ on a Mac) and the “move up” shortcut Ctrl-] (Command-]) to move selected layers up and down. Shift-Ctrl-[and Shift-Ctrl-] (Shift-Command-[and Shift-Command-] on a Mac) will bring layers to the very top or the very bottom of the stack.
- Select a layer by using the keyboard shortcuts Alt-[and Alt-] (Option-[and Option-] on a Mac). These keystrokes let you move up and down through the layers in the Layers palette.
- Create a new layer by pressing Shift-Ctrl-N. This will bring up the New Layer dialog box. Want to create new layers quickly without having to deal with the dialogue box? Simply press Shift-Ctrl-Alt-N.
- Photoshop Toolbox:

Some of the tool icons have small black triangles in their bottom right-hand corners. The triangle indicates that there are more related tools available. If you click on the tool icon and hold it down, an extra box will appear, displaying the additional tools.

Selection tool
You can use the selection tools to select certain areas of your document for editing. If you use a selection tool, only the area that’s selected will be affected by any changes you make. You can use a different shape of areas by holding down the selection tool and select the shapes beside.
When working with Photoshop, you will use selections all the time. Selections are areas of an image that you choose to isolate from the rest of the image to make modifications to, or to copy and paste into other images (or even the same image again). You can also start with a new layer and use selections as a drawing tool. A fancy effect that selections are famous for is replacing heads! With a little practice you can, for example, select your head and place it into another body seamlessly.
It’s possible to select and deselect more than one portion of the already existing selection. Located on the left side of the Marquee toolbar are four buttons that enable you to, from left, select normally, add to a selection, subtract from a selection, and intersect with a selection. There are also key combinations that enable the same options. By holding down after a selection has already been made, you can add to that selection. A tiny plus sign appears next to the mouse pointer, and the Addition button in the Marquee toolbar will be highlighted. By holding down the button, on the other hand, you can subtract from a current selection. A tiny minus sign appears next to the mouse pointer, and the Subtraction button in the Marquee toolbar will be highlighted.
You can use the Lasso tools to create freehand selections. The Lasso Tool comes in three different forms:
Lasso Tool – Click and drag the Lasso Tool to draw selection area. Releasing the mouse button will close the selection by joining the start and endpoints with a straight line.
Polygonal Lasso Tool – Click at different points to create vertices of a polygonal shape. Close the selection by moving your cursor to the beginning and clicking once, or pressing the Enter key.
Note: If you’ve made a selection, only the pixels within the selection are active and can be worked on. Some tools can be used without making a selection at all. However, be aware that if you have not made a specific selection, Photoshop will assume that you are working on the entire layer and any changes you make will affect all pixels in the layer.
Magnetic Lasso Tool – If you think you need help with making your selection, try the Magnetic Lasso Tool. Photoshop will attempt to make a smart selection by following the edges of contrast and color difference. Click once near the edge of an object and follow around it – Photoshop will automatically lay down a path. You can also click as you follow the line to force points to be created on the path. Close the selection by pressing the Enter key or clicking at a point near the beginning of the selection.
Magic Wand
The Magic Wand Tool selects areas of similar color. You can change the tolerance of a Magic Wand selection, and choose whether you want the selection to be contiguous or not.
Move Tool
The Move Tool moves a selected area or an entire layer.
Crop Tool
The Crop Tool is used to trim images. Create a selection using the Crop Tool, then double-click the center of the selection, or press Enter, to crop the image to the size of the selection.
Drawing Tools
Brush
The Brush Tool is suitable for soft-edged painting or drawing. Draw lines or curves by clicking and dragging the mouse over the document window. You can change the brush size and other settings in the options bar at the top of the window.
Pencil Tool
The Pencil Tool is suitable for hard-edged drawing or painting and has similar options to the Brush Tool for setting its size, opacity, etc. The Pencil Tool is often used for drawing and editing individual pixels in, zoomed-in images.
Eraser
The Eraser Tool removes drawing pixels from the selected layer. You can choose between Pencil, Brush, or Block mode from the options bar.
Paint Bucket
The Paint Bucket Tool fills a selection with a single color. To use the Paint Bucket Tool, click once in the area that you want to fill.
Gradient Tool
Gradient Tool fills the selected area with smoothly reducing or changing color. Apply a gradient by choosing your gradient style, setting your desired colors, then clicking and dragging the cursor over the area to be filled with a gradient.
Text Tool
The Text Tool creates text layers. This one is easy to use the tool. Just select the Text Tool, click on the area you want to insert, and start typing. You can also click and drag to create a rectangular text area that will force text to fill within its boundaries. You can change the font size, color, and other text properties using the options bar. When the Text Tool is active, you can move the cursor outside of the text area. The cursor will change from the “text insert” cursor to the “move” cursor, and you will be able to move the text layer.
Shape Tools
You can create shapes simply by clicking and dragging Rectangle, Rounded Rectangle, Ellipse, Polygon, Line, and Custom Shape tools. Shape tools are vector image creators who do not lose the quality by resizing. If the resolution of the image is increased to any level, the quality of the image remains unaffected.
Spot Healing and Healing Tool
The spot healing brush is used to remove unwanted elements from an image. To use it, select spot healing tool and paint over the imperfections. This tool will automatically repair it by using the surrounding area.
The Healing Brush Tool performs a similar function to the spot healing brush tool mentioned above. Instead of automatically trying to determine the lighting, shading, and texture from the surrounding area, the healing brush tool lets you manually select a source, and then paint over an imperfection. To select source hold down Alt and click on the area you want to copy. Then click and paint on the imperfection area to repair with the selected source.
Patch Tool
With the Patch Tool, an entire area can be repaired with pixels from another area. Just like the healing brush tool, the patch tool will try to correct the image. To use the patch tool, first, draw a selection with any of the selection tools or the patch tool. Then, using the patch tool, drag that selection over the destination you want to use to repair that area.
Clone Stamp Tool


Cloning means creating an exact copy. The Clone Stamp tool allows you to paint with a sample of an image. Press Alt hold and click on the source area, then paint where you want to recreate that image. Recreate that in a new layer and you can edit that layer individually to resize, change opacity, etc.
Blur & Sharpen Tools
The Blur and Sharpen Tools allow us to change edges by making them softer or harder wherever we want to blur.


Dodge and Burn Tool
By selecting dodge and burn you can lighten or darken the image or part of the image. Simply select the dodge or burn tool and drag over the area where elements are to be corrected.


Color Replacement Tool
This tool helps you to change the color of an object by not altering its shadows, brightness, color saturation, etc. Change the color you want in the toolbox color tile, then by color replacement tool drag over the object.


Selecting Colors
Click on the foreground and Background color tile in the toolbox and select the color you wish.
Color Pick Tool / Eye dropper Tool
This tool lets you sample another color from your image, and set this as the foreground color. It is actually possible to sample colors from anywhere in your display and even from other applications outside of Photoshop. Simply click inside the document window, and then drag the cursor to the color you wish to sample. Click ok to select that color.
The Paint Brush, Pencil, Paint Bucket and any of the other painting or drawing tools can temporarily be turned into the Eyedropper Tool by holding down Alt.
Zooming
The best way to zoom in, click and drag the slider in the navigator palette. Or use Control+ and Control- to zoom in zoom out respectively.
Tutorial Summary
This tutorial completed an overview of Photoshop, common tools, basic tasks and some editing techniques in Photoshop. Editing a photo by the combination of many techniques explained above will give you unbelievable images and non-achievable by other photo editing software. Even if you are a beginner to Photoshop you can understand the concepts by carefully studying this tutorial. You can watch the online video tutorial provided on this website for further information about Adobe Photoshop.